Saturday, November 15, 2008

Finally! A Recipe With No Sugar OR Chocolate

As promised, here is one of my go-to recipes for insanely busy nights when you're sick of takeaway pizza and the drive-thru menu at Wendy's.

And it's a hell of a lot more healthy as well.

I could probably even trust my teen-aged sons to make this one. Probably.

Red Bean and Cheese Burritos
(from The Perfect Pantry, inspired from Zatarain's website.)

(Add some leftover beef or chicken or even pork if you wish).

3 1/4 cups water
1 pkg. red beans and rice mix
1 1/2 cups shredded cheese
1 cup salsa (hot or mild, your preference)
1 1/2 cups guacamole
8 flour tortillas

Method:**

Place water and red beans and rice mix in a 2-qt. glass bowl. Stir to combine, cover with plastic wrap, and place in the microwave. Cook for 8 minutes on full power, then 12 minutes on medium power, stirring occasionally. The water should be mostly, but not entirely, absorbed. If it's too watery, cook on full power, one minute at a time, as needed. Remove from the microwave and set aside for 5 minutes.

Stir half the cheese into the rice and beans.

Heat the tortillas on a plate in microwave for a few seconds. Place each tortilla on a plate; top with beans and rice mixture and shredded cheese, and add salsa and guacamole. Roll up and serve.

**I made the beans and rice mix on the stovetop, per instructions on the box, then proceeded with the recipe as seen here.

It's good, cheap, and easy!

This Cookie Is Money! (Too Much Guy Fieri)

I want to start this post by stating that I do know how to make things other than sweet desserts; "Really Ah do!" she drawled like Hepburn.

It doesn't seem like it so far, though, does it?

I'm on a sweet kick right now. Soon I'll be into Christmas baking, and then there's no turning back. So I promise I will lay some regular cooking on you soon, 'kay?

I tried out a simple recipe I found on The Perfect Pantry, who had been inspired by the Zatarain's web site to create it. Red Beans and Cheese Burritos. I'll post that next, although I have no pictures of it. Very quick and very easy, good for those weeknights when you get home and the last thing you want to face is the kitchen and hungry, gaping mouths whining, "What's for dinner?"

But for now, on to:


Double Chocolate Espresso Cookies
(
I'm sorry but I don't remember where I got this recipe; please come forward if it's yours and I will gladly acknowledge you.)

3 squares (1 oz each-I used Baker's-comes in a small box.) of unsweetened chocolate, chopped.
2 cups chocolate chips, divided
1/2 cup butter, cubed
1 Tbsp. instant coffee granules
1 cup plus 2 Tbsp. sugar
3 eggs
3/4 cup flour*
1/2 tsp. baking powder
1/2 tsp. salt

Method:

In a small heavy saucepan, melt unsweetened chocolate, 1 cup of the chocolate chips, and butter with coffee granules; stir until smooth. Remove from the heat; set aside to cool.

In a small mixing bowl, beat sugar and eggs for 3 minutes or until thick and lemon-colored. Beat in the chocolate mixture.

Combine the flour, baking powder and salt; add the chocolate mixture. Stir in remaining chips.

Drop by rounded teaspoonfuls 2 inches apart onto greased baking sheets. **
Bake at 350 degrees F. for 10-12 minutes or until puffed and tops are cracked. Cool for 5 minutes before removing to wire racks to continue cooling.
Yield: 3 dozen.


* If you're astounded or doubting the amount of flour in this recipe, relax. I couldn't believe it either so I double-checked the recipe and it really only uses that paltry 3/4 cup. It will look more like cake batter than cookie dough, but I found that when you chill the dough like I did (overnight) it will look and handle like cookie dough--I promise.

**I live and die by parchment paper. I usually use them twice over before discarding in order to feel a bit less guilty about using a product that is not exactly earth-friendly. I'll make up for it elsewhere, dear Mother Earth; I promise.

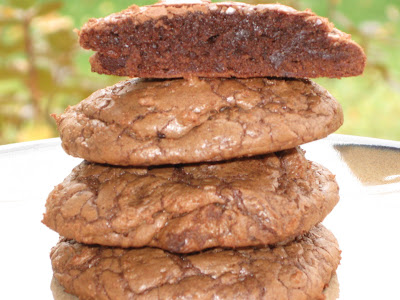
I absolutely adore these cookies. They're light, yet the interiors are dense with chocolate flavor, and the tops are all cracked and crinkly-looking, almost like the tops of brownies.

Monday, November 10, 2008

These Are Great Cookies, Y'All!


(Is everyone getting tired of the leaves in the background yet? I think I am, but I'm taking advantage of natural lighting, and that's what it happens to look like beyond my front porch. Soon enough it will be a blur of white...snow, that is, snow, which rhymes with blow, which is what the wind does at fierce speeds around these parts...but I'm rambling. Again.)

Today's recipe is courtesy of Paula Deen. Say what you will about the woman's butter fetish, or her dra-w-l, or that cackling laugh of hers, she can cook like nobody's business. And that ebullient spirit of hers-how can anyone watch a session of Paula in the kitchen and not come away with a renewed love of life? The woman oozes joy from every pore. A friend got me Paula's book for Christmas last year. What a story she has to tell. She has overcome such adversity, so many roadblocks, and it hasn't brought her down. She's a survivor and she has all my respect. Can't say fairer than that.

That being said, here are...

Chocolate Raspberry Cookies


Ingredients:

1 cup (2 sticks) butter, softened
1 cup sugar
1/2 cup lightly packed brown sugar
2 large eggs
1 tsp vanilla
2 1/2 cups all-purpose flour
1/3 cup Dutch process cocoa
1 tsp. baking powder
1 pkg (6 oz) raspberry creme filled dark chocolate baking pie
ces
(recommended: Hershey's Premier Dark Chocolate Baking Pieces Filled With Raspberry Creme)
Raspberry Icing (recipe follows)

Preheat oven to 350 degrees F. Lightly grease baking sheets.

With an electric mixer, beat butter and sugars together at medium speed until fluffy. Add eggs and vanilla, beating well.

In a small bowl, combine flour, cocoa, and b aking powder; gr
adually add to butter mixture, beating until blended. Stir in baking pieces. Drop cookies by tablespoonfuls onto prepared baking sheets. Bake 12-14 minutes.

Remove to wire racks to cool. Once cool, drizzle with Raspberry Icing.


Raspberry Icing:

1 1/2 cups confectioners' sugar
2 Tbsp. milk
1 Tbsp. seedless raspberry preserves


In a small bowl, combine all ingredients, stirring until smooth.

I love the way this pic shows the ooey, gooey chocolate piece, fresh and still warm. Yummmm

I used a small-sized ice cream scoop for these and it worked quite well.
These cookies are terrific iced or plain.
Do not overbake; let me repeat that: do not overbake. They will become chunks of concrete-don't ask me how I know.


The Ants Go Marching One By One....

This cookies contain one of my favorite ingredients-or maybe I should call them decorations. You know them by several names: chocolate jimmies, chocolate sprinkles, but in JaneWorld, they are called chocolate ants.
As you might have guessed, there is a story behind this. And here we go...

I had the great good fortune to grow up with a mother who was a full-time homemaker. My mother has the gift of making every holiday outstandingly special, and when I was growing up, one of our favorite traditions was baking an overwhelming number of Christmas cookies and giving out 'cookie plates' to our neighbors.

When I was very young, I was allowed to help decorate the rolled-out sugar cookies. I looked forward to that day every December, when Mom would bring out her vast cookie cutter collection and I would watch her rolling out dough, cutting magical shapes out of that dough.

The best part of all was when the cookies had cooled and the embellishing began. I probably wore more colored frosting than the cookies did, and my attempts at frosting them were far from eye-pleasing but they looked beautiful to me.

Mom had an extensive assortment of sprinkles and dragees to top the cookies with, and this brings me to---

The Chocolate Jimmies Fiasco

One year Mom allowed me to invite one of the neighbor kids over to join in on the cookie decorating. His name was Shawn, and we were both probably around first grade.
Shawn and I were in the middle of adorning cookies when he reached across the table for one of the plastic bottles, which was open at the top.
Did I mention that Shawn was big for his age? And clumsy? And one of those kids that calamities just seems to happen to?

Of course you can see where this is going. He somehow managed to dump an entire bottle of chocolate sprinkles all over the kitchen linoleum. And when I say 'all over', well...and they really did look like an army of ants convening in our kitchen. ("I'd like to call this meeting of the Ants local 231 to order...")

Every year thereafter we rehash that story as we decorate cookies. All my kids loved this tradition and licked many a gob of frosting off their fingers over the years.

My kids are now 26, 23, 20, and 18 but I still shanghai them into the kitchen when it's Christmas sugar cookie time. They still enjoy decorating the cookies, or maybe they're just humoring me, I'm not sure. But I love every minute.


Chocolate Truffle Cookies
(a Taste of Home recipe that I changed slightly)


Ingredients:

1 1/4 cups butter, softened
2 1/4 cups confectioners' sugar
1/3 cup baking cocoa
1/4 cup sour cream
1 Tbsp. vanilla
2 1/4 cups all-purpose flour
(2 cups chocolate chips, which I omit)
1/4 cup chocolate sprinkles

Method:

In a large mixing bowl, cream butter, confectioners' sugar and cocoa until light and fluffy. Beat in sour cream and vanilla. Add flour; mix well. Stir in chocolate chips, if using. Refrigerate for one hour or overnight.

Roll into 1 inch balls; dip in chocolate sprinkles. Place, sprinkled side up, 2 inches apart on ungreased baking sheets. Bake at 325 degrees F. for 10 minutes or until set. Cool 5 minutes before removing to a wire rack to cool.


I omit the chocolate chips because I think they get in the way of the truffle-like taste. I also think there are more than enough cookies out there that require chips; these cookies stand on their own very nicely.

This recipe doubles very well. In fact, I've never made a single batch. These are my husband's favorite cookies.


This was one of those recipes that was quick to throw together and made the house smell heavenly. All those apple pie-ish spices---m-m-m-mm.

Here's something I never thought I'd hear myself saying: these are sweet enough. I didn't even frost them! There, I said it. And I still can't believe that I had the opportunity to have appley-glaze on these puppies and I turned it down. Unthinkable!

But true. These guys don't need no stinkin' frosting. By all means, feel free to follow the recipe if you want. Without the frosting, it's much easier to justify eating them.
"They're really just like muffins--a breakfast food! I can have another; they're health food, what with the apples and all."

This is what the voices in my head say.


Caramel-Apple Mini Cakes

(taken from King Arthur Flour website)

Cake:

2 Cups Flour, traditional or whole wheat
1 tsp. baking powder
1 tsp. salt
1 tsp ground cinnamon
1/4 tsp. ground nutmeg
1/4 tsp ground allspice or 1 tsp. apple pie spice
3/4 Cup unsalted butter
1 1/2 Cups brown sugar
3 large eggs
1 tsp vanilla
3 Tbsp. boiled cider or frozen apple juice concentrate
1/2 Cup applesauce**
3 Cups peeled, chopped apples (about 3 med. apples)
cook's note***


Frosting:

5 Tbsp. unsalted butter
1/4 tsp. salt
1/2 Cup firmly packed brown sugar
2 Tbsp. corn syrup
3 Tbsp. milk
1 1/2 Cup confectioners' sugar
1/2 tsp. vanilla
1/4 tsp ground cinnamon


Method:

Preheat the oven to 350 degrees F. Grease the wells of 12 muffin cups*****

Whisk together the flour, baking powder, salt, and spices; set aside. Cream together the butter and sugar until light and fluffy. Beat in the eggs, stopping once or twice to scrape the sides and bottom of the mixing bowl, then mix in the dry ingredients, vanilla, boiled cider (or juice) and applesauce, stirring until evenly moistened. Fold in the apples and walnuts, if using.

Transfer the batter to the prepared pans. Bake for 20-22 minutes, or until a cake tester inserted in the center comes out clean. Cool the cakes for 15 minutes before turning out of the pan; cool completely before frosting.

For the frosting:

Melt the butter, stir in the salt, brown sugar, and corn syrup and cook, stirring, until the sugar melts. Add the milk, bring to a rolling boil, and pour into a mixing bowl to cool for 10 minutes. Stir in the sugar, vanilla, and cinnamon. Beat well; if the mixture appears too thin, add more confectioners' sugar. Spread on the cakes while the frosting is still warm.

Yield: 12 (or much more) servings


**for the applesauce, I measured out one of those individual servings in the little plastic cups and it was exactly right, so if you have some of those on hand, you wouldn't need to open a big jar of applesauce.

cook's note***If you insist on riddling your baked goods with them, you can add 3/4 cup chopped walnuts to the batter before pouring into pans. The original recipe does call for them but I usually do a Reader's Digest condensed version, omitting the vile things.

*****I got a full two dozen mini cakes out of this batter. I'm not sure why, but I always get more cupcakes, muffins, etc. than the recipes predict. So be prepared for just about any amount--if you try this recipe, let me know how many you get!