Showing posts with label chocolate. Show all posts

Wednesday, September 9, 2009

Peanut Butter Chocolate Chunk Brownies with Ganache Topping


Oops. Too late.


I suppose if one were burning w
ith curiosity as to who had attacked this
brownie prior to the photo, one could always access dental
records, (bite marks are pretty damning evidence, don't you think?) but is it really that important? You can still see the big chunks of
chocolate, the denseness of the peanut butter brownie, and the thick layer of
semisweet topping; everything you need to see, in fact, to convince you to try this recipe. Except for the faint traces of chocolat
e on someone's
front choppers. Naming no names.


Peanut Butter Chocolate Chunk Brownies with Chocolate Ganache
(adapted from Cookie Madness)

Ingredients:

8 oz. (two sticks) unsalted butter, cut into slivers
1 3/4 cup granulated sugar
1/2 teaspoon salt
2 teaspoons vanilla extract
1 cup peanut butter
2 large eggs plus 1 egg yolk
2 cups all-purpose flour
1 1/2 cups semisweet chocolate chunks (or more; you know me--or actually, you don't-I almost always add extra chocolate chunks, chips, etc.)

Ganache:

1 1/2 cups semisweet chocolate chips (only because they melt faster than chunks)
1/2 cup heavy cream
1 tablespoon unsalted butter, softened


Method:

Preheat oven to 350 degrees F. Line a 13 x 9 inch metal pan* and spray with
non-stick cooking spray or rub with butter.

Cream the butter and sugar with electric or stand mixer. When light and fluffy,
add peanut butter and beat until incorporated. Beat in eggs, the egg yolk and vanilla. By hand, stir in the flour and chocolate chunks. Spread batter in pan, patting it down flat**, and bake on center rack for 35-40 minutes or until puffed
and golden. Cool completely.

Make the ganache: place chocolate chips in heat-proof bowl. In a saucepan, heat the cream until it starts to boil. Pour the cream over the chips and let stand for a minute. Stir well to melt chips; stir in the butter. Spread on cooled brownies and let set.

Makes 36 bars. Don't scoff at this; they are very, very rich.


* I usually use a Corning 13 x 9 glass pan, adjusting my oven temp. to compensate. (You know about lowering recipe temps. about 25 degrees F. when using glass dishes, right?)

** I usually spray a Rubbermaid spatula with non-stick spray to pat the batter down with and smooth the surface a bit.

Friday, June 26, 2009

One Lump or Two?


I have had a hankering to try a root beer cake for quite a while, and being
faced with two recipes, I chose this one because it was larger. It filled a
Bundt pan instead of a snack-cake type one. I figured if the cake
turned out well, I'd want plenty of it around. Most chocolate cakes don't last very
long in our house, and I'd love to blame it on the male population but in a rare
moment of self-confession, I admit that I'm the one with no self-control.
I just can't leave it alone until it's gone--and then I begin plotting anew for the next
dessert to grace my kitchen counter, erode my self-discipline, and increase my self-loathing.

By the way: it really does taste like root beer--chocolate root beer, which is wonderful
and puzzling at the same time--you can find this out if you dip an index finger into
the batter, just to test it, of course. Don't forget this taste-test, because after it's baked, you lose some of the root beer overtones, as it were.


Root Beer Float Cake

(from Joy the Baker)

Ingredients:

2 cups root beer (don't use diet)
1 cup unsweetened cocoa powder
1/2 cup unsalted butter, cut into 1/2 inch cubes
1 1/4 cup granulated sugar
1/2 cup dark brown sugar
2 cups all-purpose flour
1 1/4 teaspoons baking soda
1 teaspoon salt
2 large eggs

Preheat oven to 325 degrees F. spray the inside of a 10- inch Bundt pan with nonstick cooking spray or butter generously and dust with flour, knocking off the excess.

In a small saucepan, heat the root beer, cocoa powder and butter over medium heat untilo butter is melted. Add sugars and whisk until dissolved. Remove from heat and let cool.

In a large bowl, whisk together the flour, baking soda and salt.

In a small bowl whisk the eggs until just beaten. Then whisk into the cocoa mixture until combined. Gentle fold the flour mixture into the cocoa mixture. The batter will be slightly lumpy. You can give it a quick whisk if you like, but don't overbeat the batter or it could cause the cake to be tough.**

Pour the batter into prepared pan and cook for 35-45 minutes, rotating the pan halfway through baking until a sharp knife inserted in the center comes out clean. Transfer to a wire rack or cake plate to cool completely.

Sorry there are no pictures for this one, but if you've seen one dark brown Bundt cake, you've seen 'em all. Besides, I forgot to take any pictures before it got scarfed.


**For fear of over-beating, I did not worry about the little lumpies that were in the batter--BIG MISTAKE!!! The finished product ended up with little pebbles of white flour (or something equally nefarious) that my sons were convinced were chunks of mold and thereby refused to eat. That meant more for me--NOT a good situation, as my too-tight scrubs will attest).

****caveat!! This frosting was a little weird. I followed the directions faithfully with no substitutions, etc. but I would do it differently next time. It's a great buttery frosting with a beautiful texture, but very salty! I was puzzled why you would use unsalted butter but then add salt to it. Next time I will use salted butter and eliminate the teaspoon of salt altogether--I mean, I realize that a bit of salt can enhance the chocolate flavor, but this was overpowering, and I only used half what the recipe called for. I'm glad I listened to my gut feeling or it would have been inedible. And for me to consider anything chocolate as inedible...


Try this frosting at your own risk--

Chocolate Root Beer Frosting

2 oz. 60% cocoa, melted
1 stick unsalted butter, softened
1 teaspoon salt
1/4 cup root beer
2/3 cup unsweetened cocoa powder
2 1/2 cups powdered sugar

In the bowl of a stand mixer, or using an electric hand mixer, beat softened butter and cocoa powder. Once combined, add the melted chocolate, salt, powdered sugar and root beer. Beat together until smooth. Spread on top of cooled cake. slice and serve with vanilla ice cream.


Sunday, May 31, 2009

Chocolate Fudge Cookies with Dried Cherries and Toffee

Chocolate Fudge Cookies with Dried Cherries and Toffee


I scored pret-ty big this weekend, and no, I don't mean that way,
although if this was a true-confessions-type of blog, or one of those
graphic and crude ones, I could tell you some stor...nevermind.

I like Scharffenberger chocolate. I don't like the news that Hershey's bought
the company because I hate to see smaller companies scarfed up by conglomerates
only to have the smaller company name disappear. I haven't been able to learn
if Hershey plans to make Scharffenberger go away or not yet, but I hope they leave
the name and quality alone. If you have any newer information about this, please
let me know.

The thing that brought all this to mind was when I was perusing the aisles
at my local Meijer, (for those not living in Michigan and Ohio, it's a huge
grocery and department store-kind of place) I found myself in the baking section,
where I am often found, truth to tell, drooling over huge chunks of chocolate
and other add-ins for cookies and various other baked goodies.
I spotted the Scharffenberger with orange price stickers: this means only one thing:
clearance. They were originally marked $4.99 but cut down to $2.50.
$2.50?!?! As I grabbed bar after bar, I wondered if maybe the reason they
were marked down was because they were running the stock out in order to
change the package, name, product, etc.
I hope not.


Chocolate Fudge Cookies with Dried Cherries and Toffee
(Regan Daley)


Ingredients:

2 1/4 cups AP flour
1/2 cup unsweetened dutch-processed cocoa powder
1 teaspoon baking soda
1/4 teaspoon salt
1 cup unsalted butter, room temperature
1 cup packed dark brown sugar
3/4 cup granulated sugar
2 large eggs
1 1/2 teaspoon pure vanilla extract
1 cup plump, moist, dried Michigan cherries
8 oz. bitter or semisweet chocolate chopped into chunks about the size of the cherries
1 cup English toffee pieces for baking such as Skor Bits

Method:

Preheat oven to 350 degrees F. Line two heavy baking sheets with parchment paper and set aside. Sift flour, cocoa, baking soda and salt together in a bowl and set aside. In a large mixing bowl or the bowl of a stand mixer fitted with the paddle attachment, cream together the butter and both sugars until light in color and fluffy-about 2 minutes. Add the eggs, one at a time, beating well after each addition and scraping down the sides of the bowl. Beat in the vanilla. Stir in the flour mixture in 3 additions, blending just until the dry ingredients are moistened. This part is really easier with a wooden spoon since the batter is very dense. Stir in the chocolate pieces and cherries and toffee bits.

At this point the dough may be frozen for up to 4 months; wrap securely in plastic wrap and place in a plastic freezer bag; thaw in the refrigerator without removing the wrapping before portioning the cookies and baking.

Drop the batter by heaping tablespoons onto the prepared baking sheets and place them in the center of the oven, turning half way through baking.

Bake the cookies for 15-18 minutes or until barely set in the center and just firm around the edges. Cook cookies on tray for 3-5 minutes, then transfer to wire rack to cool completely before storing. Store in air-tight container layered with sheets of parchment or waxed paper for up to 5 days.

I do want to warn you, though, that these end up pretty flat. I was a bit disappointed
that way, since I really don't like cookies that are flatter than the goodies you add to the dough.
But I'm not beaten.
I intend to try this one again, modifying it somehow to keep them from flattening
like the proverbial pancakes. They do have an excellent taste, with that crispiness
that you get with brown sugar in the dough. These are definitely
worth trying again.

And then I'll take pictures of them!

Saturday, November 15, 2008

This Cookie Is Money! (Too Much Guy Fieri)

I want to start this post by stating that I do know how to make things other than sweet desserts; "Really Ah do!" she drawled like Hepburn.

It doesn't seem like it so far, though, does it?

I'm on a sweet kick right now. Soon I'll be into Christmas baking, and then there's no turning back. So I promise I will lay some regular cooking on you soon, 'kay?

I tried out a simple recipe I found on The Perfect Pantry, who had been inspired by the Zatarain's web site to create it. Red Beans and Cheese Burritos. I'll post that next, although I have no pictures of it. Very quick and very easy, good for those weeknights when you get home and the last thing you want to face is the kitchen and hungry, gaping mouths whining, "What's for dinner?"

But for now, on to:


Double Chocolate Espresso Cookies
(
I'm sorry but I don't remember where I got this recipe; please come forward if it's yours and I will gladly acknowledge you.)

3 squares (1 oz each-I used Baker's-comes in a small box.) of unsweetened chocolate, chopped.
2 cups chocolate chips, divided
1/2 cup butter, cubed
1 Tbsp. instant coffee granules
1 cup plus 2 Tbsp. sugar
3 eggs
3/4 cup flour*
1/2 tsp. baking powder
1/2 tsp. salt

Method:

In a small heavy saucepan, melt unsweetened chocolate, 1 cup of the chocolate chips, and butter with coffee granules; stir until smooth. Remove from the heat; set aside to cool.

In a small mixing bowl, beat sugar and eggs for 3 minutes or until thick and lemon-colored. Beat in the chocolate mixture.

Combine the flour, baking powder and salt; add the chocolate mixture. Stir in remaining chips.

Drop by rounded teaspoonfuls 2 inches apart onto greased baking sheets. **
Bake at 350 degrees F. for 10-12 minutes or until puffed and tops are cracked. Cool for 5 minutes before removing to wire racks to continue cooling.
Yield: 3 dozen.


* If you're astounded or doubting the amount of flour in this recipe, relax. I couldn't believe it either so I double-checked the recipe and it really only uses that paltry 3/4 cup. It will look more like cake batter than cookie dough, but I found that when you chill the dough like I did (overnight) it will look and handle like cookie dough--I promise.

**I live and die by parchment paper. I usually use them twice over before discarding in order to feel a bit less guilty about using a product that is not exactly earth-friendly. I'll make up for it elsewhere, dear Mother Earth; I promise.

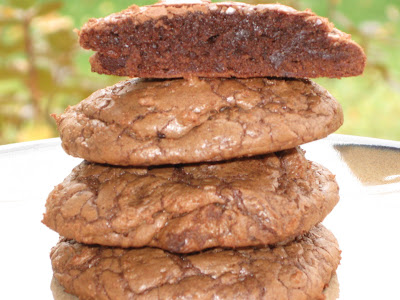
I absolutely adore these cookies. They're light, yet the interiors are dense with chocolate flavor, and the tops are all cracked and crinkly-looking, almost like the tops of brownies.

Monday, November 10, 2008

The Ants Go Marching One By One....

This cookies contain one of my favorite ingredients-or maybe I should call them decorations. You know them by several names: chocolate jimmies, chocolate sprinkles, but in JaneWorld, they are called chocolate ants.
As you might have guessed, there is a story behind this. And here we go...

I had the great good fortune to grow up with a mother who was a full-time homemaker. My mother has the gift of making every holiday outstandingly special, and when I was growing up, one of our favorite traditions was baking an overwhelming number of Christmas cookies and giving out 'cookie plates' to our neighbors.

When I was very young, I was allowed to help decorate the rolled-out sugar cookies. I looked forward to that day every December, when Mom would bring out her vast cookie cutter collection and I would watch her rolling out dough, cutting magical shapes out of that dough.

The best part of all was when the cookies had cooled and the embellishing began. I probably wore more colored frosting than the cookies did, and my attempts at frosting them were far from eye-pleasing but they looked beautiful to me.

Mom had an extensive assortment of sprinkles and dragees to top the cookies with, and this brings me to---

The Chocolate Jimmies Fiasco

One year Mom allowed me to invite one of the neighbor kids over to join in on the cookie decorating. His name was Shawn, and we were both probably around first grade.
Shawn and I were in the middle of adorning cookies when he reached across the table for one of the plastic bottles, which was open at the top.
Did I mention that Shawn was big for his age? And clumsy? And one of those kids that calamities just seems to happen to?

Of course you can see where this is going. He somehow managed to dump an entire bottle of chocolate sprinkles all over the kitchen linoleum. And when I say 'all over', well...and they really did look like an army of ants convening in our kitchen. ("I'd like to call this meeting of the Ants local 231 to order...")

Every year thereafter we rehash that story as we decorate cookies. All my kids loved this tradition and licked many a gob of frosting off their fingers over the years.

My kids are now 26, 23, 20, and 18 but I still shanghai them into the kitchen when it's Christmas sugar cookie time. They still enjoy decorating the cookies, or maybe they're just humoring me, I'm not sure. But I love every minute.


Chocolate Truffle Cookies
(a Taste of Home recipe that I changed slightly)


Ingredients:

1 1/4 cups butter, softened
2 1/4 cups confectioners' sugar
1/3 cup baking cocoa
1/4 cup sour cream
1 Tbsp. vanilla
2 1/4 cups all-purpose flour
(2 cups chocolate chips, which I omit)
1/4 cup chocolate sprinkles

Method:

In a large mixing bowl, cream butter, confectioners' sugar and cocoa until light and fluffy. Beat in sour cream and vanilla. Add flour; mix well. Stir in chocolate chips, if using. Refrigerate for one hour or overnight.

Roll into 1 inch balls; dip in chocolate sprinkles. Place, sprinkled side up, 2 inches apart on ungreased baking sheets. Bake at 325 degrees F. for 10 minutes or until set. Cool 5 minutes before removing to a wire rack to cool.


I omit the chocolate chips because I think they get in the way of the truffle-like taste. I also think there are more than enough cookies out there that require chips; these cookies stand on their own very nicely.

This recipe doubles very well. In fact, I've never made a single batch. These are my husband's favorite cookies.


Friday, October 24, 2008

The Second Best Chocolate Chip Cookie Around

Today's recipe, boys and girls, is adapted from The New York Times, July 9, 2008.

This is--ta da...

Grand Marnier Chocolate Chip Cookies.

This is a good cookie recipe. It's not a great recipe, but it's a good one.
I wish I could remember where I found it. Friends, family, and ex-boyfriends all know that
my memory is by now like Swiss cheese: full of holes. I throw that out at the beginning of our relationship because it's only fair that you read this blog fully informed.

It's really not much different than various and sundry other recipes I've tried over the course of my baking life, except for the Grand Marnier.
I was so hoping that the addition of this gorgeous liquid would elevate this recipe
to the level of unusual and unique, bringing me accolades and ticker tape parade status.

But no.

Truth to tell, I (with my highly trained and discerning taste buds) couldn't even detect the Marnier in it. And that lovely stuff is too expensive to use in anything where it doesn't shine through.

That said, here is the recipe. Let me know what you think of it. Can you taste this?


Grand Marnier Chocolate Chip Cookie
Ingredients:

2 C. minus 2 Tbsp. cake flour
1 2/3C. bread flour
1 1/4 tsp. baking soda
1 1/2 tsp. baking powder
1 1/2 tsp. coarse salt
2 1/2 sticks unsalted butter, softened
1 1/4 C. light brown sugar

1 C. plus 2 Tbsp. granulated sugar
Zest of one orange
2 large eggs

1 1/2 tsp. vanilla
1 1/2 tsp. Grand Marnier orange liqueur
1 1/4 lbs. bittersweet chocolate, 60% cocao content, chopped into chunks. **


Method:

Sift flours, baking soda, baking powder and salt into a bowl. Set aside.

Using a mixer fitted with paddle attachment, cream butter, sugars, and zest togeether until very light, about 5 minutes. Add eggs, one at a time, mixing well after each addition. Stir inthe vanilla and Grand Marnier. Reduce speed to low, add dry ingredients and mix until just combined, 5-10 seconds. Drop chocolate pieces in and incorporate them into the dough. Press plastic wrap against dough and refrigerate for 12-36 hours. Dough may be used in batches, and can be refrigerate for up to 72 hours.


When ready to bake, preheat oven to 350 degrees F. Line a baking sheet with parchment paper or a non -stick baking mat. Set aside.

Scoop six 3 1/2 oz mounds of dough (the size of generous golf balls: about a 1/3 of a cup***) onto each baking sheet, making sure to turn horizontally any chocolate pieces that are poking up; it will make for a more attractive cookie. Sprinkle lightly with sea salt and bake until golden brown but still soft, 18-20 minutes. Transfer to a wire rack to cool before serving. Yield: over 2 dozen, depending on size of dough mounds.


** Of course, I used more than the stated 1 1/4# of chocolate (it's a sickness, I tell you.)

*** I used a standard-sized ice cream scoop to make the dough mounds and it worked well.


One day very, very soon, I will deliver what I (and the unwashed hordes that I call 'family') consider The Perfect Chocolate Chip Cookie.

You don't expect me to give away all my best secrets right away, do you? Then you'd have no incentive to keep coming back! Ta!


Saturday, October 18, 2008

Hello again.

I'm back rather quickly, but I have a reasonable if pathetic reason: since I finally found the key to my universe last night around 11:00pm (said key being the simplest way to get pictures onto my posts) I really need to repeat the process quickly, before my Swiss cheese brain has time to forget it.

So here it is: one of my favorite recipes for chocolate chip scones. Most of my scone recipes call for heavy cream, but this one uses buttermillk, which I never have on hand. However, I substitute regular milk with 2 teasp. of vinegar added to make it go sour. This works like a charm every time.
Being the chocolate fiend that I am, if I omit the fruit pieces, I usually double the amount of chocolate chips to compensate. I have also used mini chocolate chips but found them too small for the big chocolate taste I was looking for. Nestle's chocolate chip chunks work even better.
It's a sickness. I should be pitied, not scorned.


Chocolate Chip Scones


2 C. flour
1/4 C. white sugar
1 1/4 teasp. baking powder
1/4 teasp. baking soda
1/4 teasp. salt
1/2 C. unsalted butter, cold and cut into slivers
1/2 C. milk or semi-sweet chocolate chips
1/2 C. dried cherries or cranberries (opt)
1 teasp. vanilla
2/3 C. buttermilk


Egg mixture for brushing tops of scones before baking:

1 large egg, lightly beaten
1 Tablespoon milk

Cinnamon Sugar: (opt., I don't usually use this because I prefer the chocolate to be the primary taste focus)

2 T. sugar
1/4 teasp. cinnamon


Method:

Preheat oven to 400 degrees F. and place rack in middle of oven. Line a baking sheet with parchment paper.

In a large bowl, whisk together the flour, sugar, bakng powder, baking soda and salt. Cut the butter into slivers and blend into the flour mixture with a pastry blender or two knives. The mixture should look like coarse crumbs. Stir in the chocolate chips and dried cherries (if using). In a small measuring cup whisk together the buttermilk and vanilla and then add to the flour mixture. Stir just until the dough comes together (add a bit more buttermilk if necessary). Do not over mix the dough.

Transfer to a ligihtly floured surface and knead dough gently four or five times and then pat the dough into a circle that is about 7 inches round. Cut this circle in half, then cut each half into 4 pie-shaped wedges. Place the scones on the baking sheet. Make an egg wash of 1 beaten egg mixed with 1 tablespoon milk and brush over the tops of the scones. To make the cinnamon sugar, mix sugar and cinnamon together. Sprinkle the tops of the scones with a little of the
mixture.


Bake for about 15-20 minutes or until golden brown and a toothpick inserted in the middle comes out clean. Remove from oven and transfer to a wire cooling rack.

Makes 8 scones.


(adapted from a recipe from The Joy of Cooking.com)